
Jump to:
➩ What are flows?
➩ Create a flow with Bot Actions:
↳ Simple Message
↳ Collect Info
↳ Ask a Question
↳ CSV Lookup
↳ Delays
↳ Patch a Call
➩ Start an Inbox Conversation

What are flows?
Flows are chatbots or interactive message sequences. Flows use natural language processing to parse through data and make your messages more conversational.
Flows can be broadcasted to members or triggered by members, using Automations.
What if a member replies to a flow with an invalid answer?
With Strive you can create a validation message if a member is not answering your question with a valid response. Learn more
Can I edit, duplicate, or delete flows?
Yes, click the Actions menu (...) next to the flow you'd like to modify to select one of these options.
Note: Editing a flow that has been broadcasted or triggered via automations can alter your Broadcast and Flow Reports data!
Clone an existing flow or create a new flow via the Actions Menu if you'd like to make updates to a flow that has been previously interacted with.
Can I modify member data with flows?
Yes! You can collect and validate data using Collect Info bot actions. Other bot actions allow you to modify data based on a member's response. Configure your bot actions to add or remove members to groups and save custom calculations to member records based on how member responds.
Create a flow with Bot Actions
- Go to the Flows page
- Click Add Flow
- Name your Flow and select Create
- Click Add Bot Action
- Select your bot action type
Note: Strive will pre-populate a TCPA compliant kick-off simple message. You can customize the message and message type for the flow you are creating. Learn how to ensure your messages are TCPA compliant
What are bot actions?
Bot actions are the steps in a flow. There are 6 types of bot actions you can use to create custom flows.
Simple Message
Simple message bot actions are non-interactive messages, meaning they are not waiting for a member’s reply. You’ll notice 2 simple messages back to back will send at the same time, this is because simple messages are non-interactive.
Send and Hold: This setting makes your simple message interactive. The bot action will wait for a member's reply before sending the next bot action in your flow. Send and hold will wait for any response from a member before moving to the next action.
Create a Simple Message bot action
- Select Simple Message.
- Create your simple message, including dynamic fields
- Select if you would like your message to send and hold. If the send and hold setting is selected, the next message in your flow will hold until your member replies
- Select if you'd like to add or remove members from groups when they reach the bot action
- Click Save on the bottom of your bot action
Collect Info
Collect info bot actions collect data from members. By defining what type of data you're looking for, Strive will parse through members' responses and map that data to your Members List.
Check and Collect: This setting will prevent your campaign from asking for member data that you already have. If a member already has this data available, your flow will proceed to the next bot action.
Note: Collect Info bot actions can only parse for one piece of data per action. You cannot collect multiple pieces of data in a single collect info bot action at this time.
Collecting multiple values in a single collect info step
With collect info bot actions, campaigns have the option of collecting a member's full address or full name in a single bot action. Instead of asking for this information in a series of questions, you can ask for all of the information at once (example: What is your mailing address?). Strive will parse a member's response and map the data to the respective fields.
Full Address
Collect and validate a member's street address, city, state, and zip code by selecting Full Address from the What are you collecting? dropdown. Next select Street Address, City, State, Zip code from the Save result in a field drop down.
Full Address Autovalidation: Strive will attempt to geo-match any provided address data to a precise geolocation. If a match cannot be made, or there are multiple matches, due to invalid or insufficient address data, Strive will automatically respond with a validation message.
Depending on the validation issue, Strive will provide a custom validation response instructing the member how to reply and what data is needed to yield a successful geolocation match. If a member continues to respond with invalid data, Strive will route their conversation to the Needs Response folder of the Inbox. Learn more about Strive's core address fields.
Note: If a partial address is provided (example: street address and zip code) and Strive can make a geolocation match, Strive will auto populate any missing fields (example: city, state). Strive will attempt to find any partial address data, and save valid data to the members list, even without autovalidation enabled.
Full Name
Collect and validate a member's first and last name by selecting Full Name from the What are you collecting? dropdown. Next select First name, last name from the Save result in a field drop down.
Full Name Autovalidation: If Strive is unable to parse for a member's first and last name, Strive will prompt the member to reply with their first and last name separately. If a member continues to respond with invalid data, Strive will route their conversation to the Needs Response folder of the Inbox.
Create a Collect Info bot action
- Select Collect Info
- Create your Collect Info message prompt, including dynamic fields
- Select the data you are collecting with your message, and the field in the members list you’d like the data to map to
- Select if you would like your collect info message to "check & collect". Check & collect will parse your Members list for your collect info data and only send your collect info message to members who do not have this data available. If a Member already has this information populated, your flow will proceed to the next bot action
- Optionally, select if you'd like to add or remove members from groups when they reach the bot action
- Click Save on the bottom of your bot action
Tip: Use data collected in a previous message to populate dynamic fields in your next message. Include dynamic fields like first name to make steps in your flows feel personalized.
Ask a Question
Ask a question bot actions can ask Yes/No, Multiple Choice, or AI Intents questions. Ask a question bot actions can add members to groups, or reroute them to a new flow depending on the member’s response.
Yes/No
Yes/No questions will parse member replies for affirmative responses (yes,yup, yeah, ok, sure) and negative responses (no, nah, nope, no thanks, not now). Strive's natural language processing library includes English and Spanish yes/no responses.
Multiple Choice
Multiple Choice questions will parse member replies for response options and synonyms you define. Multiple choice questions usually ask members to reply with options by letter or number (A,B,C or 1,2,3).
Intents
Intents questions will parse member replies for intents and synonyms you define. Intents use AI to identify the action or goal of incoming messages from members. Intents in flows expand the ability to understand and categorize the purpose behind a member’s message as they interact with your campaign. Intents can recognize variations of your intents and synonyms like:
- Recognize misspelled words, i.e. match the misspelled word “Acess"” with the intent “Access"
- Recognize tenses of words, i.e. match the tense “volunteering” with the intent “volunteer”
- Parse for root words in a larger phrase, i.e. match “I want to take action" with the intent “Act"
- Identify words and phrases of similar meaning, i.e. match “I want to donate used jackets and shirts" with the intent “clothing drive"
Intents questions usually ask members to reply with options by letter or number (A,B,C or 1,2,3). Intents can recognize both exact matches and variations to your response options.
Important tip: Make sure your intents are distinct from one another. If you have separate intents that are too similar in the same bot action (for example Intent: Monthly Donation vs. Intent: Donation ) it may result in inaccurate matching.
Create a Yes/No bot action
- Select Ask a Question
- Set your question type to Yes/No
- Enter your ask a question message, including dynamic fields
- Optionally, enter your Yes and No success messages
- Select if you'd like to add or remove members from groups based on if they reply Yes or No
- Select if you'd like a Yes and/or No response to reroute members to another flow in the Reroute to dropdown menu
- Select a field from the Save result in a field dropdown menu if you’d like to automatically map member responses to a field in your members list
- Select if you'd like to save a custom value /calculation to the member's list based on the response by clicking Save Custom Value
- Optionally, add a validation message to your bot action
- Click Save on the bottom of your bot action
Create a Multiple Choice bot action
- Select Ask a Question
- Set your question type to Multiple Choice
- Enter your multiple choice question message, including dynamic fields
- Enter info for each Response Option. To add another response option click +Add Response Option at the bottom of the bot action
- Define the Response to Capture for each response option
- Enter synonym(s) for each response. Click +Add after each synonym
- Optionally, enter your success message for each response option, including dynamic fields
- Select if you’d like to automatically add or remove members from groups when a member replies with a specific response option
- Select if you'd like to save a custom value /calculation to the member's list based on the response by clicking Save Custom Value
- Optionally, add a validation message to your bot action
- Click Save on the bottom of your bot action
Create an Intent bot action
- Select Ask a Question
- Set your question type to Intents
- Enter your question message, including dynamic fields
- Enter info for each Response Option. To add another response option click +Add Response Option at the bottom of the bot action
- Define the Intent to Capture for each response option
- Enter synonym(s) for each intent. 5 synonyms are required so AI has enough terms to reference. Click +Add after each synonym
- Optionally, enter your success message for each response option, including dynamic fields
- Select if you’d like to automatically add or remove members from groups when a member replies with a specific response option
- Select if you'd like to save a custom value /calculation to the member's list based on the response by clicking Save Custom Value
- Optionally, add a validation message to your bot action
- Click Save on the bottom of your bot action
CSV Lookups
CSV lookup bot actions reply with custom messages based on a member's response or data saved on their profile. This means CSV lookups can reply with thousands of potential responses, unique to the member. CSV lookup bot actions use imported CSV data. Create if/then logic and optionally reroute members to other flows or add them to groups based on their match in the CSV.
What is the difference between a response lookup and a field lookup?
Response Lookups use the member's response to find a match in your CSV. For example, prompting a subscriber to guess which city has the highest living costs. Strive uses artificial intelligence to parse through responses from members. Exact matches are not needed to trigger a response.
Field Lookups use a field in the members profile to find a match in your CSV. For example, by collecting a subscriber's zip code s in a collect info step, your field lookup can use the auto-saved state to provide voter registration info. The field drop down includes the eligible member fields that can be used for matching in field lookups (both core and custom).
Field lookups matching on State and Federal lawmakers will require the CSV template that is generated in the flow builder. Download the CSV to enter your success messages, based on the lawmaker.
What file types do CSV Lookup bot actions accept?
At this time, we accept CSV files. If you are working out of Excel or Google Sheets, you can export your document as a CSV.
Can my replies include dynamic fields and links?
Yes! Make sure you format your links and dynamic fields the same way they are auto-formatted in the Strive compose window. To ensure formatting is correct, generate the fields and links in the compose window and copy the template into your CSV.
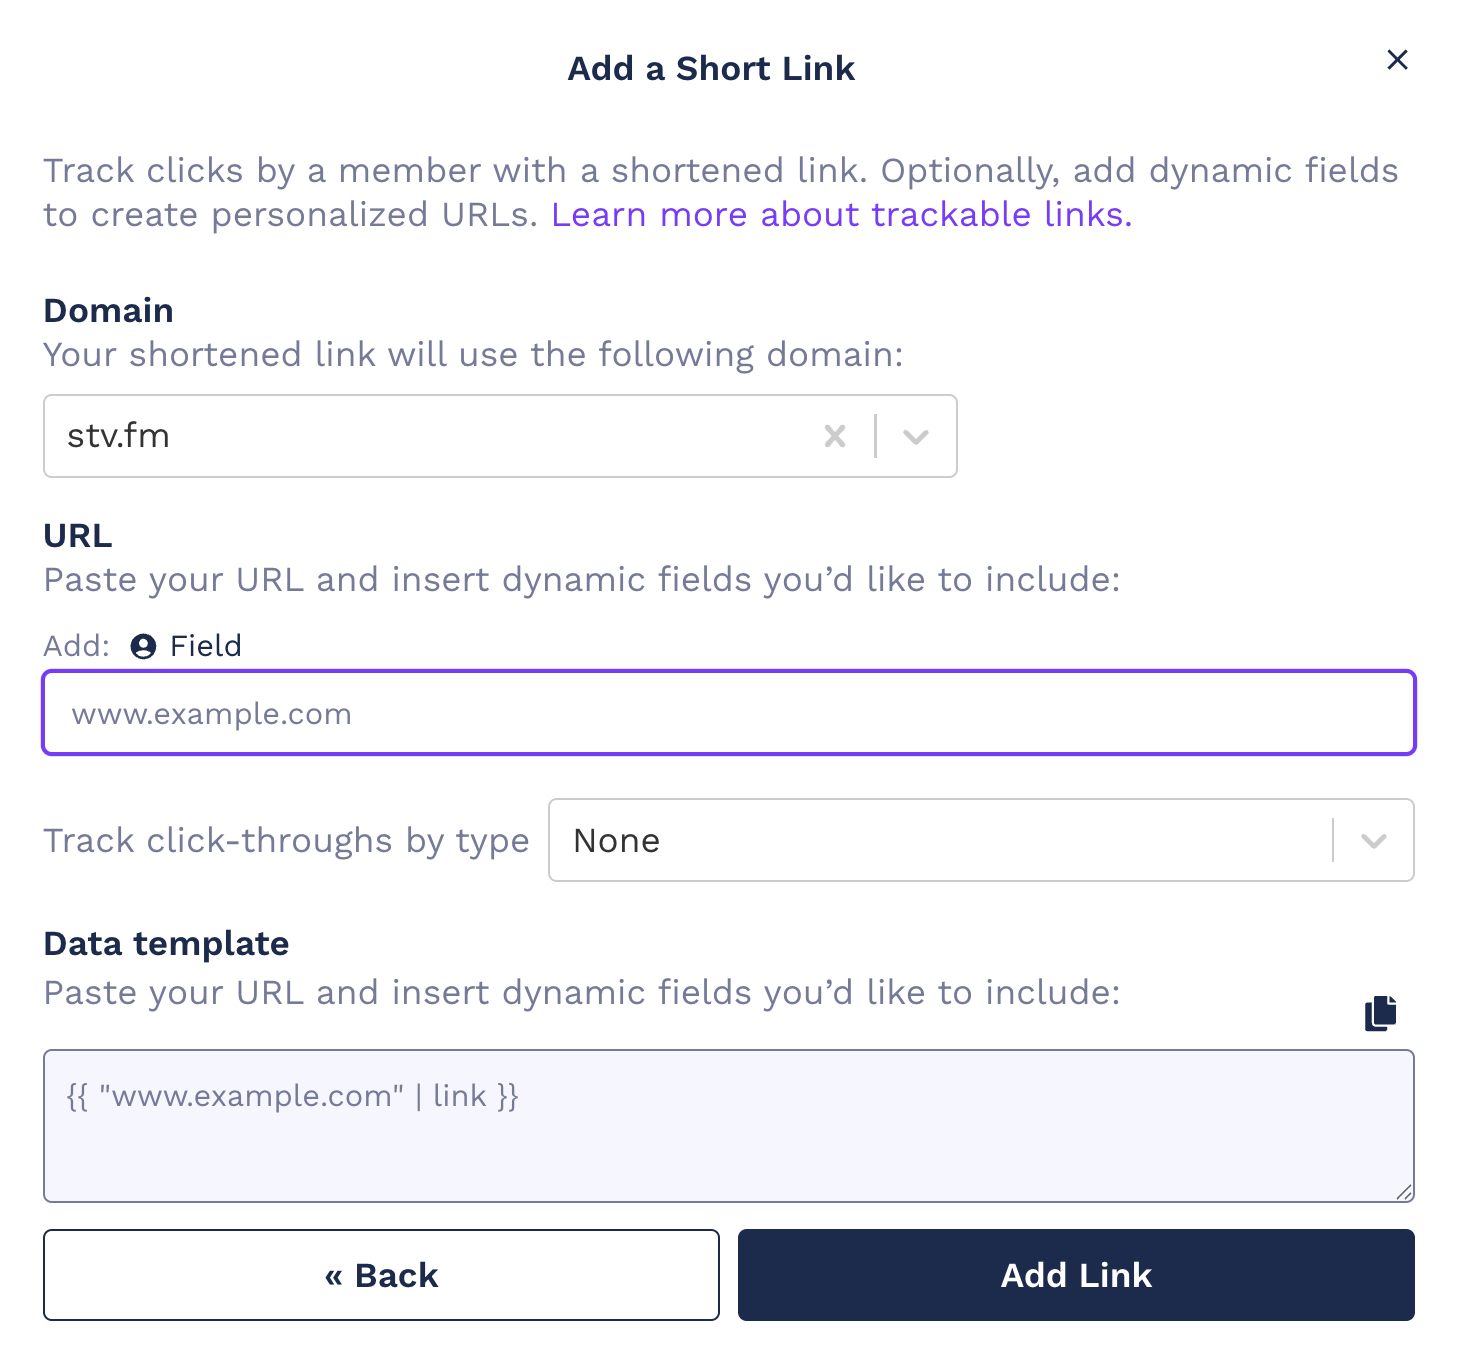
For links, a template is provided in the link shortener popup window under Data Template. The template can be copied and added to your success message cell to include a shortened link.
What are repeating Response lookups?
Optionally, allow members to engage with the bot action multiple times. Enable this setting via the Advanced Options menu. We recommend including a prompt in your reply so that members know they can interact with your prompt again.
Example reply: "The nearest polling place to zip code 11111 is The Main St Library located at 123 W Main St, Townsville, CA 11111. Reply with another zip code to find a different polling place."
Where can I see all of my CSV Lookup files ?
Click the CSV Uploads button from the Flows page (above the flow table). See a complete history of the imports, replace imports, or rename them by clicking the ellipses (...) in the Action menu.
How do I map my CSV files for CSV Lookup bot actions?
Click Add Response Lookup File and drop in your CSV. Strive will ask you to map the follow required fields:
- Response to Capture: this is the column in your CSV with either the replies or field matches, like zip code. Add synonyms for responses by separating the values with a comma (Example: 60102, 60103). For field lookups matching on federal and state lawmaker core fields, you must map the Source Identifier column in the CSV templates as your response to capture.
- Success Message: this is the column in your CSV with the corresponding outgoing messages you'd like Strive to send when a match is detected.
Optionally, you can reroute members to new flows and add them to groups based on their reply. Map your data to the following fields:
- Add to group(s): this is the column in your CSV with the corresponding groups you would like to add members to based on their response. This field is not case-sensitive. Separate group values with a comma if you would like to add members to multiple groups based on response. (Example: Volunteers, Donors)
- Reroute to flow: this column will include any reroutes, based on response. Use the flow ID value in this column. To find the flow ID, navigate to the flow in the flow builder and copy the digits after "flows/" in the URL. (Example: for the URL https://app.strivemessaging.org/campaigns/273/flows/2477 the flow ID is 2477). Note: A response to capture can only reroute members to a single flow. Your import will fail if your cell contains multiple values for this object.
Save Responses and Custom Values
Optionally, you can save the member’s response and/or custom values in the Members list. Columns of custom data are mapped in the bot action to core and custom fields in your Members list. To map a calculation based on response click Save a Custom Value, select the CSV column with your calculations from the dropdown, then select the member field you'd like to map it to.
Save multiple calculations by clicking Save Another Custom Value.
Note: The data that you’re mapping must be formatted to match the data type of your custom field (text, number, boolean, date, single select, multi-select). Learn more
Check and Collect: This setting will prevent your campaign from asking for member data that you already have. If a member already has the mapped data, the bot action will automatically trigger the Success Message and/or reroutes associated with the pre-populated response to capture.
Create a Response Lookup bot action:
- Select CSV Lookup from the bot action menu, and pick Response Lookup
- Compose your message prompt
- Select your CSV or import a new one
- Optionally, set Check and Collect for any of the data you are collecting or saving
- Optionally, add a validation message
- Optionally, select if you would like the bot action to Repeat
- Click Save below the bot action
Note: Check and Collect cannot be enabled if Repeat is enabled for the bot action. Only one of these settings can be configured for the bot action.
Create a Field Lookup bot action:
- Select CSV Lookup from the bot action menu, and pick Field Lookup.
- Select your CSV or import a new one.
Note: if you are matching subscribers based on their saved federal or state lawmaker, you must download the CSV template. Select the office and state(s) to include in your template. DO NOT edit the source identifier column. Add success messages for each row. When importing your template, map the source identifier in the CSV to the response to capture. - Optionally, add a validation message
- Click Save below the bot action
Delays
Delay bot actions can delay follow-up messages by 1-7 days. Once the member reaches the preceding bot action the next message will be delayed until the delay expires.
Delays are a great way to create drip message campaigns – while keeping the members in the same flow.
Delay Bot Action
- Select Delay from the bot actions menu
- Select the number of days you'd like your messages delayed. You can delay your messages 1-7 days
- Add another bot action under the delay bot action that you would like delayed. All messages under your delay bot action will be delayed for the number of days set in your delay
Patch a Call
Patch a call bot actions patch phone calls to Federal/State Senators and Representatives or custom targets. Patch a call bot actions can play an audio message for the caller before their call is routed. Optionally, follow up with the member once their call is complete.
Where do I configure call numbers for Patch a Call bot actions?
To name your call number, upload your default audio greeting, assign targets, and upload/assign custom targets, go to the Call Numbers page. Learn more.
Can I send a follow up message after the call is complete?
Yes! When building a flow, add a follow up bot action. Callers will receive the message in that bot action once their call is complete. You can also send a custom follow up message to callers who do not answer a triggered call, and when a connection issue is detected.
How do I save address data for target/caller matching in flows?
If you haven't already, create a custom field 'Street Address' in your Members list and collect this data with collect info bot actions before patching the call. Strive uses zip code and street address data to make a match among your selected targets.
How to compose an SMS call prompt:
Calls can be initiated using an SMS call prompt, where you direct your member to trigger or place a call. You can compose your SMS call prompt using one of these methods:
- Members can trigger a call by replying “CALL”, and the selected call number will call the member. Include “Reply CALL” in your SMS prompt if you’d like for members to trigger calls.
- Members can also call the number directly. Include your call number in the SMS prompt “Call 555-555-5555 and we’ll connect you with your Senator” so members can dial in.
Call upon arrival: If you do not want to use an SMS prompt, you can use the Call Upon Arrival setting. A call from your call number will trigger when the member reaches the bot action.
Connect failure follow-up: If you'd like to send an SMS to callers when a connection failure is detected, you can prompt them to try again. We recommend using the dynamic call number field so the message automatically reflects any updates to your selected call numbers.
Member voicemail follow-up: To follow up with callers who miss a triggered call, you can send an SMS encouraging them to call you back. Again, we recommend using the dynamic call number field to ensure the message stays current with any changes to your call number selection.
Tip: If you’re using call upon arrival, make sure your supporter is aware they will be receiving a call, by including a note in the preceding bot action.
Note: If you would like Strive to match callers with their elected officials, always include a collect info bot action before your patch a call bot action to ask for address and zip code.
The more address info you have saved in your Members list, the more accurately Strive can match your caller with their elected official.
Create a patch a Call bot action
Before you set up your Patch a Call bot action, make sure to configure your call targets.
- Select Patch a Call from the bot actions menu
- Select your call number. Your call number's targets are configured on the Call Numbers page
- Compose your SMS call prompt. This can be a prompt to reply CALL and Strive will call members and patch them to your selected target(s) OR you can prompt members to call your call number. Alternatively, you can select if you'd like to call the member automatically when the reach the bot action. To trigger calls upon arrival, click Advanced Settings and check the Call Upon Arrival setting
- Next select your custom audio welcome message. If a member is interacting with your flow this audio message will overwrite the default audio message set for the call number via the Call Number page. The audio message will play before the caller is patched through to your targets. Learn more about setting a default audio greeting
- Optionally, select groups you'd like to add or remove members from when they reach the bot action.
- Click Save on the bottom of your bot action
Tip: Test your flows in the simulator to see how they look from a member’s perspective. Learn more about testing your messages.
Inbox Conversation:
Route conversations to the Inbox after a member has completed a flow. With Inbox Conversation bot actions, campaigns can configure flows to route a member to folders in the Inbox when the time is right for one-on-one or p2p style conversation.
Note: Without a Inbox conversation bot action configured conversations are unassigned, marked as unresolved, and routed to the Needs Response folder by default when a member:
- Completes a flow
- Triggers a validation message and replies again with invalid data
- DMs your campaign while not interacting with a flow
Change default conversation routing behavior:
- Select Inbox Conversation from the bot actions menu
- Select if you’d like to route the conversation to the Needs Response or Resolved column when the member reaches the bot action.
- Optionally, create a Conversation View and configure auto-assignments.
Auto-assign member conversations
By enabling Automatically assign conversations to Organizers in the Inbox, member conversations will be assigned round-robin to organizers when the flow is completed. Conversation auto-assignments will assign conversations round-robin to eligible organizers starting with the last organizer assigned a member conversation.
Note: Conversations will only be assigned to eligible organizers who have been granted access via Access groups. To update Access, go to Manage Users.
- Select Inbox Conversation from the bot actions menu
- Check the box Automatically Assign Conversations to Organizers in the Inbox
- Once enabled, members who complete your flow will be assigned round robin to Organizers who are assigned to the member's Access group.
Note: Only organizers can be auto-assigned conversations.
What are Inbox Conversation Views?
Inbox Conversation Views create a focused Inbox folder of members who have reached the bot action. Conversation Views make it easy to track interactions from multiple broadcasts and automations at once, in an organized folder structure you define.
Tip: With Conversation Views, campaigns can cluster similar member responses directly in the Inbox with AI! Learn more
Conversation view settings:
Expiration: Set the length of 30, 60, or 90 days for the Conversation View to be active in your Inbox. Strive will automatically move the conversation view into the Archive tab when the conversation view expires.
Note: If a member reaches the bot action after the conversation view expires, the conversation view will be moved back to the Active tab and the time until expiration will be reset.
Filters: if you want only certain members to be routed to your Inbox, add a filter to the Conversation View. Example: Only route members who have a state that matches Kentucky
Conversation Objectives: Conversation objectives are goals for your team to complete in the Conversation View. Objectives can include changes to group and member field data, and can require a specific change to be made to the group or field. Objectives are automatically pinned at the top of the Member Detail pane in the conversation view so users can quickly make updates to a member’s record as they hold conversations. Objectives can include things like “update custom field “Voter Status” from “No Plan” to “Voter Plan Created” or remove from the “never DM’ed” group.
Create a Inbox Conversation Bot Action:
- Select Inbox Conversation from the bot actions menu
- Select the column you’d like to route conversations to when they reach the bot action: Needs Response or Resolved
- Optionally, check the box Automatically assign conversations to Organizers in the Inbox if you’d like for conversations to be assigned to organizers on your team.
- Click Add a Conversation View
- Name your conversation view. This name will appear in the conversation views table
- Select the number of days you'd like for the conversation view to stay active for before it expires
- Optionally, add filter conditions to limit who is routed to the conversation view
Create Conversation Objectives:
After you have configured your Conversation View via the Inbox Conversation bot action you can create conversation objectives.
- Click Add Conversation Objective in the Inbox Conversation bot action
- Select if you’d like to make the objective update group or field data
- Update group membership: select the group you’d like to update then select if you’d like the action to be adding or removing members from a group in the Inbox
- Update field value: select the field you’d like to update then select if you’d like for the field to be updated with a specific value. If left blanked, Strive will accept any change to the field as completing the conversation objective in the Inbox


.svg)
.svg)

.png)